
This post may contain affiliate links. If you use them, it helps keep the blog going, which I appreciate.

Now that I’m on the other side of making all of these creations, I thought it would be cool to reflect on how the project went overall. I feel like a lot of people don’t really show their failures, and although I don’t think I failed at making my Switch 2 setup cute, I definitely made a lot of pivots once I got into it.
I also made way too many things for many reasons. Accidental purchases, purchases because I knew I was documenting this, and for the love of DIY, I didn’t want to fall through. Even though I really tried to sharpen my focus before I started, I still wasn’t entirely sure what I wanted. I originally pictured my console and accessories giving more Y2K girl power instead of pastel princess.
I also made ordering mistakes and eventually felt like, when in Rome… Since I ordered some things from overseas vendors, returning them made no economical sense. Apparently, I was just going to make more things.
The Joy-Cons


Even though this project was about using my DIY skills to cutify my Switch 2, I decided to leave the Joy-Con customization up to a professional.
Since I bought my Switch 2 well after the initial rush, I thought a lot more custom options would be available by then. This ultimately wasn’t the case. I thought I’d be able to find custom bold pink Joy-Cons that would let me work with the black hardware of the Switch overall, but I couldn’t find what I had in my head.
The Joy-Cons I eventually ordered were truly customized in the sense that UsmansConsoles custom paints the shells, the joysticks didn’t have those god-awful red and blue rings, and the buttons weren’t ones I saw other third-party customizers using. Most of the other controller mod shops I found were using third-party shells without doing much to customize the shells themselves.
Technically, this was still a project I could take on myself. I refuse because the one time I tried customizing a controller, I thought my life was over.
In the end, I did find Joy-Cons that were truly customized. However, I wasn’t initially looking for white and shimmer. I was looking for bold pink. Once I chose the white shimmer, the overall vision had to change in my mind.
The Dock

Creating the dock faceplate had a lot of components, but I was really determined to make something that wasn’t already out there. It turned out better than I thought it would, but that’s only because I ended up pivoting a lot.
First, I realized I needed to give up on working with the black hardware of the console because I had ordered white shimmery Joy-Cons. I didn’t love the idea of having such high-contrast components, so I opted to use a white base for the dock faceplate instead.
I made a basket weave with decoden piping cream. I did some practice projects first to get used to the creams I ordered. It had been a while since I piped anything, plus it’s just fun to use decoden cream.
I knew I wanted to include some Birthday Bears on the faceplate. Creating the bears was an undertaking on its own, but I like tedious and I like glitter, so it was my pleasure.
I had a clear vision for how I wanted everything to look regardless of the change in color scheme. But as we know, once you have everything sitting in front of you, ready to go, it’s easy to realize the dream ain’t dreamin’.
I needed more bears to make my original idea work. I had measured too conservatively, and the spacing would have been off. That’s when I somehow pulled a cloud out of my ass and my previous idea went out the window.
Once I decided to make a cloud, I knew in my gut that it was going to save the vision in my head.
The cloud is probably the component I’m most proud of. It solved a lot of the visual issues I was having with the dock. I also got to learn how to work with another kind of material while staying true to the whole cute thing.
At this point, the overall project was trending toward a more pastel kawaii look, but it stayed grounded because the bears gave it that magenta pop. I had a totally different concept in mind when I started, but I actually like this one more.
I like it more because I know for a fact this isn’t something that’s currently out there. Honestly, I kind of hope people feel inspired to make a dock faceplate like this. It was really rewarding.
Controller Stands


I knew the controllers I was planning to rhinestone were going to be something I wanted to display. I also wanted them to have a specific place to live so the rhinestones wouldn’t get damaged.
Obviously, the stands needed to be rhinestoned too.
At first, I only had one stand because I was only planning on designing one controller. When I ended up with two controllers, I obviously needed another stand.
The stands came in white, and I opted to start rhinestoning right away. Unfortunately, I got hit with a double whammy.
First, the rhinestones I was using were inferior. I think I had saved a bunch of B-grade rhinestones for projects that didn’t need super-perfect components. The question I have now is why did I have so many of those rhinestones?
Either way, they were pretty bad quality, and the white stand highlighted every single problem.
I opted to scrape everything off, paint the stands colors similar to the rhinestones I was using, and start again. The stands turned out significantly better.
Painting the bases close to the rhinestone colors was a little difficult because the stones were color-shifting, but it gave them a much more mature, seamless look. Instead of looking like, “I just wanted this to sparkle,” everything actually looked intentional.
I realized that even though I just wanted a place for my controllers to live, I shouldn’t have rushed into working on them. Had I taken the time to paint them first, I could have avoided a lot of heartache.
I rushed into stoning because I was using the stands as a warm-up for the Panda Controllers. I was really excited to start working on those, but I wanted to wake my brain up a little with a rhinestone project that had fewer curves and lines.
Apparently, the warm-up needed a warm-up.
Panda Controllers

Rhinestoning the Panda Controllers was pretty straightforward once I sorted out my materials. I started with 6ss rhinestones, and I really wanted to use only those.
However, with all the curves I needed to navigate, I eventually had to introduce 3ss and 4ss rhinestones. I couldn’t deal with the gaps that were forming. I made it through a decent portion of the pink controller before deciding to start over with mixed-size stones. Thankfully, I scraped everything off before the B-7000 glue could completely dry.
B-7000 was amazing to work with, primarily because of the precision tip on the bottle.
I also ended up rhinestoning two Panda Controllers because of some online ordering missteps. I ended up with two controllers, so I figured I might as well bedazzle both of them.
The finished controllers actually looked better than what I had in mind. Since the controller itself dictated where the rhinestones should go, this project was more execution versus creation.
It was absolutely worth starting the pink controller over. The gaps between the pink rhinestones were much less visually forgiving than they were on the black Panda.
I probably should have learned my lesson from rhinestoning the stands.
Travel Cases
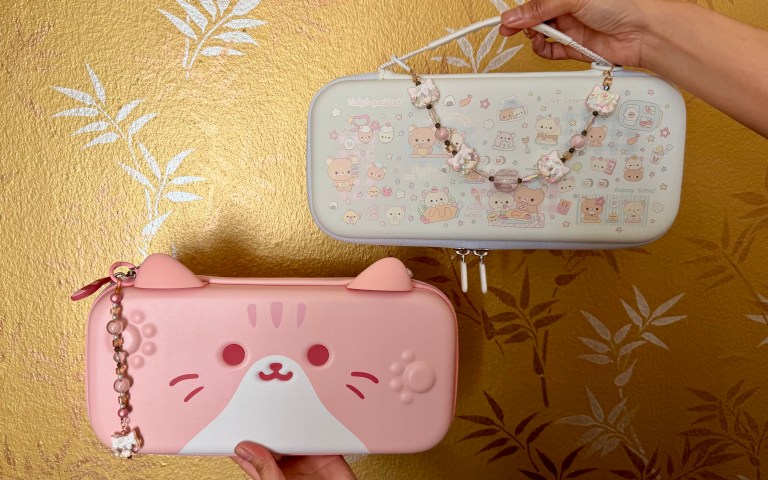


Before I talk about this, I have to admit that I was packing to move while I was working on this part of the project. Again, I wanted to do more, but life had to do its thing.
I created charms to add to my travel cases. I ended up with two cases because I couldn’t decide which one I wanted.
I know. Woe is me.
The cases were already so cute that I didn’t feel the need to add too much or modify them. I kind of wanted to add rhinestones to the Rilakkuma case, but with the pressure of the move, I left it alone. I can always go back to it.
Making the charms was more or less practice in jewelry making. I had a lot of cute beads that needed to have their moment to shine, and I already had all the materials I needed on hand.
I’m not sure if doing less made the cases better, but I do know adding more would have made them clunkier and more fragile than they needed to be. They’re travel cases. They need to be able to take a hit without me searching for glue to fix whatever fell off.
Final Thoughts

This project really deviated from what I initially had in my mind. I’ve noticed over the years that I’ve learned to have more grace with myself when I can’t execute exactly what’s in my head.
I used to do one of two things: quit or spend more money trying to get something exactly how I imagined it.
I used to quit a lot.
I mean, a lot of the things I plan on posting about are projects I walked away from for one reason or another. The Cute Effect has given me not only a space to share the stuff I’m making with people out there, but also motivation to see things through. Aside from crafting, I really enjoy documenting the process.
Instead of quitting or throwing money at the problem, this Blonde Asian takes a moment and flows with whatever is going wrong.
When I couldn’t find the color Joy-Cons I wanted, I changed the color scope of the project. When the bears didn’t fit on the dock the way I wanted, I made a cloud. When the rhinestones were leaving bigger gaps than I liked, I started over. When I needed to move and pack up my stuff, I did less with the cases.
I’m better at responding to and assessing the situation in front of me instead of dying on an imaginary hill.
Documenting my crafts also makes me more likely to finish things because I feel like I hid this facet of myself for over a decade. I never thought what I made was good enough.
But now, I don’t really care if it’s good enough for the general public. These projects are for me and my use. If I like it, I did it.